This article explains how to correctly install, secure, connect, and use the RAINPOINT SH101 Sprinkler Soaker Hose.
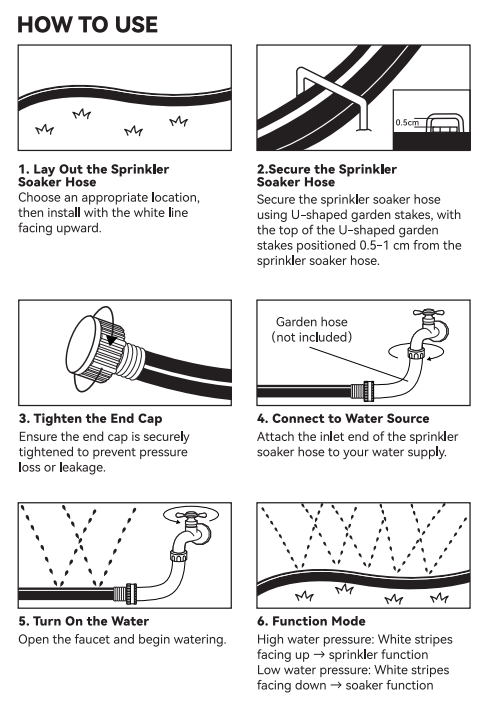 Step 1: Lay Out the Hose
Choose the watering area and lay the sprinkler soaker hose in the desired position.
For sprinkler watering, position the: White stripes facing upward.
Keep the hose as level and straight as practical.
Step 2: Secure the Hose
Use the supplied U-shaped garden stakes to hold the hose in position.
Important:
- Keep the top of each stake approximately 0.5-1 cm above the hose.
- Do not push the stake too deeply against the hose.
- Do not position a stake directly over a sprinkler hole.
Installing the stakes too deeply or directly over the holes may restrict the hose or affect water pressure and spray performance.
Step 3: Tighten the End Cap
Make sure the end cap is securely tightened.
This helps prevent:
- Pressure loss
- Water leakage
Confirm that the sealing washer is correctly positioned inside the end-cap connection.
Step 4: Connect to the Water Source
Connect the inlet end of the SH101 to the water source.
The manual also recommends using approximately 6 ft (2 m) of regular garden hose between the faucet and the SH101 where practical.
This can help prevent the user from being sprayed directly when the faucet is first turned on.
Step 5: Turn On the Water
Open the faucet gradually.
Recommended working pressure: 40-60 PSI
Do not exceed approximately: 60 PSI
Excessive water pressure may damage the hose.
Step 6: Select the Watering Effect
Sprinkler Mode
- White stripes facing upward
- Higher water pressure
- Produces overhead spray
Soaker Mode
- White stripes facing downward
- Lower water pressure
- Produces gentler watering closer to the soil
Connecting Two SH101 Hoses
The SH101 can be extended by connecting another compatible hose.
Connection Steps
- Unscrew the end cap from the first SH101.
- Connect the female end of the second hose to the male end of the first hose.
- Make sure the rubber O-ring is installed inside the female connector.
- Tighten the connection securely.
- Turn on the water and check for leakage.
Installation on Different Terrain
Flat Terrain
Lay the hose flat and keep the watering holes properly oriented.
Uneven Terrain
Try to prevent the hose from:
- Tilting to one side
- Folding
- Kinking
These conditions may affect water distribution and spraying performance.
Important Installation Notes
Do Not Cover the Hose with Soil
The manual specifically advises: Do not cover the SH101 with soil.
Soil may block the sprinkler holes and affect normal operation.
Keep the Hose Free from Kinks
Kinks may reduce pressure to downstream sections.
Keep Stakes Away from Spray Holes
Do not place U-shaped stakes directly over the watering holes.
Flush Debris When Necessary
The removable end cap allows the hose to be opened so debris inside the hose can be flushed out.
Comments
Please sign in to leave a comment.